I spent a good portion of the Tour de Fleece watching my teammates turn out so many awesome hand-dyed fibers and seeing how beautifully they spun up. While I did think my purchased fibers were beautiful, I still felt like I was missing out on the fun of making my own colors. Not going to lie, I was a little jealous. Not in the angry spiteful way, but in the way that made me know I just had to try it for myself.
Sometimes peer pressure is a very good thing!
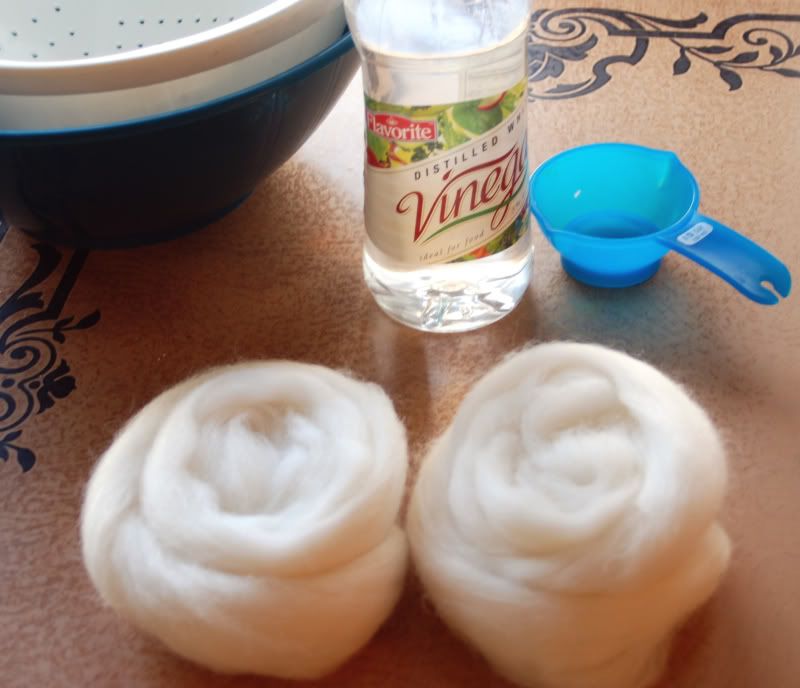
I ended up finding a killer deal on some undyed Shetland wool, and now it's my turn to play. I have some Koolaid on standby, but first some natural dyeing.
I looked at tons sources beforehand and pestered (and post stalked) my fellow Ravelers for hints and advice first. One of them was the person who linked me the blog with instructions for dyeing with blueberries and dyeing with tea. My info on fiber prep came from this Knitty article
Since I am practically allergic to following directions, I decided to document my whole process, so I would know what worked (and what to avoid) for future adventures. And since I was going to do all that, why not share it will anyone stumbling onto here?
Before starting any dyeing, I had to presoak the fiber. I wanted to try both dyeing with tea and with blueberries so I took the 2 ounces I had decided to use and split it in half.

I filled the large bowl with cool water and a half cup of vinegar, and after putting both lengths of fiber into the colander I set it in the bowl. I let the fiber soak overnight and into the next day, about 15-16 hours.

Knowing I wanted to start with the tea dying, first thing that morning I put 8 tea bags (plain old Lipton cheap black tea) into 2 cups of very hot water and let steep for the 6 1/2 hours I was at work. By the time I got home the water was cool and very dark.

I pulled one of the lengths of fiber out of the soaking solution, and after squeezing some of the excess water out (Gently! No wringing!!) I layed it in a small Pyrex container and poured the tea over it.
Then I covered the dish with plastic wrap, and started the heating process.
(and I used these same heating times for the blueberry dye)
3 times I used 2 minutes of microwaving on high followed by 2 minutes rest
The twice I heated for 1 minute followed by a 4 minute rest
Last were the 4 bursts of 30 seconds heat followed by 4 minutes rest
Microwaves vary, and I think mine runs a little high to be honest. The object was to keep the water around the fiber to just under a boil. The whole process went on for about 45 minutes total before I took it out to cool.
While I was doing all that, I was also making the blueberry dye.
Now blueberries are what had made me think about natural dyeing in the first place. I went to the blueberry farm during a festival, and ended up with a ton of berries. Way more than I needed in fact. Easy to do on such a good growing year, especially when they're under $2 a pound! Some got frozen right away, some got eaten, but there was a bowl in the fridge that I never got to. A little past good eats (but not yet moldy) I hated the thought of wasting them, and so when I learned they could be used for dyeing fiber I was sold!
I put these berries, there was about 2 1/2 cups, with 3 cups of water in a saucepan. I also threw in a shot of lemon juice. I know I pre soaked the fiber in vinegar water and it probably didn't need the added help, but I figured it couldn't hurt. I brought the water to a boil and then lowered it to simmer, stirring and slightly smashing the berries while I worked with the tea fiber.
It took about 20 minutes for the water to really start coloring, you can see that on the left. By the time the tea fiber was finished the blueberry water was much darker, as you can see on the right.

Then came the most important part, the one I should have been much more careful about.
Listen up, and save yourself some frustration -
Strain the blueberries out of the dye water well.
Very well.
Anything that you don't get out of the water at this point will only cause you more work later. I was very careful to get all the gooey, dripping, chunky parts out, but I didn't account for all the tiny seeds that I couldn't even see slipping through.
Seeds that even after 4 rinses had my water looking like this

Arrrrgh
If I had planned ahead, I would have thought to run the dye water over cloth or something. Live and learn.
I didn't pour this dye over the fiber right away. I let it cool a little bit because was afraid of shocking the wool into felting. Being new, i thought it better to ere on the side of caution. By the time I poured the blueberry dye over the fiber it was only slightly warm.

I followed the same heat/rest cycles as I did for the tea, and then put it on the table to cool.
The instructions I'd read said to soak the fiber in the dye overnight (or longer) but patience is not one of my virtues. The dishes just sat there taunting me.

After just a couple hours my resolve started breaking. I pinched a little of the fiber out of each, rinsed, dried and twisted it in order to see what kind of results I was going to get.

I think the colors look soooo pretty together. I'm almost sure I will be plying them together after I get them spun.
I tried to be good after that, and just peek and poke at the fiber. I told myself that morning was that far away. Surely I could hold out until then...
Or Not.
I ended up rinsing the tea dyed fiber out after 7 hours. I just couldn't hold out any longer, and seven hours is kind of like overnight. Sort of. I reasoned that loads of people sleep less, and so that would be overnight for them...
I much better with excuses than patience, but I think I made a good decision. The resulting color is just what I had hoped for.
It took 3 rinses before the water was clear, but I did it once more to be safe. Then I soaked up as much water as I could press out of the fiber with a towel, and hung it to dry.
It was getting late, so I actually did let the blueberry dyed fiber soak overnight. Probably a good idea, because I had a lot of rinsing ahead of me. I lost count of how many water changes it took to get rid of the seeds, but it was a lot!
When I was finally satisfied, I pressed the water out and hung the fiber to dry.
--
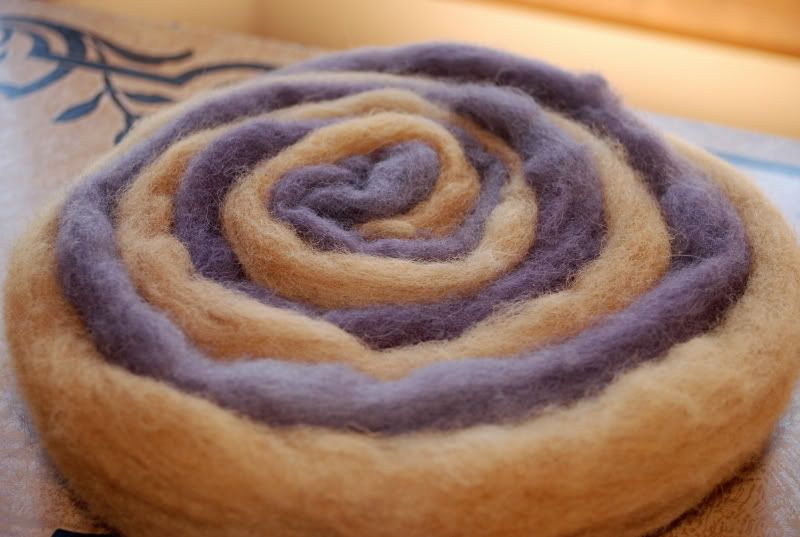
Now the fiber is dry, and still looks beautiful. This picture shows the color most true to life

But this picture is my favorite, because it looks like the fruity sticky bun I think of when I see the colors together

I am so happy with the results, and would do this again in a heartbeat. I would dye more fiber next time though, because that's a lot of work for just an ounce each. And I would strain those blueberries better, blasted seeds!!
Sometimes peer pressure is a very good thing!
I ended up finding a killer deal on some undyed Shetland wool, and now it's my turn to play. I have some Koolaid on standby, but first some natural dyeing.
I looked at tons sources beforehand and pestered (and post stalked) my fellow Ravelers for hints and advice first. One of them was the person who linked me the blog with instructions for dyeing with blueberries and dyeing with tea. My info on fiber prep came from this Knitty article
Since I am practically allergic to following directions, I decided to document my whole process, so I would know what worked (and what to avoid) for future adventures. And since I was going to do all that, why not share it will anyone stumbling onto here?
Before starting any dyeing, I had to presoak the fiber. I wanted to try both dyeing with tea and with blueberries so I took the 2 ounces I had decided to use and split it in half.
I filled the large bowl with cool water and a half cup of vinegar, and after putting both lengths of fiber into the colander I set it in the bowl. I let the fiber soak overnight and into the next day, about 15-16 hours.

Knowing I wanted to start with the tea dying, first thing that morning I put 8 tea bags (plain old Lipton cheap black tea) into 2 cups of very hot water and let steep for the 6 1/2 hours I was at work. By the time I got home the water was cool and very dark.

I pulled one of the lengths of fiber out of the soaking solution, and after squeezing some of the excess water out (Gently! No wringing!!) I layed it in a small Pyrex container and poured the tea over it.
Then I covered the dish with plastic wrap, and started the heating process.
(and I used these same heating times for the blueberry dye)
3 times I used 2 minutes of microwaving on high followed by 2 minutes rest
The twice I heated for 1 minute followed by a 4 minute rest
Last were the 4 bursts of 30 seconds heat followed by 4 minutes rest
Microwaves vary, and I think mine runs a little high to be honest. The object was to keep the water around the fiber to just under a boil. The whole process went on for about 45 minutes total before I took it out to cool.
While I was doing all that, I was also making the blueberry dye.
Now blueberries are what had made me think about natural dyeing in the first place. I went to the blueberry farm during a festival, and ended up with a ton of berries. Way more than I needed in fact. Easy to do on such a good growing year, especially when they're under $2 a pound! Some got frozen right away, some got eaten, but there was a bowl in the fridge that I never got to. A little past good eats (but not yet moldy) I hated the thought of wasting them, and so when I learned they could be used for dyeing fiber I was sold!
I put these berries, there was about 2 1/2 cups, with 3 cups of water in a saucepan. I also threw in a shot of lemon juice. I know I pre soaked the fiber in vinegar water and it probably didn't need the added help, but I figured it couldn't hurt. I brought the water to a boil and then lowered it to simmer, stirring and slightly smashing the berries while I worked with the tea fiber.
It took about 20 minutes for the water to really start coloring, you can see that on the left. By the time the tea fiber was finished the blueberry water was much darker, as you can see on the right.

Then came the most important part, the one I should have been much more careful about.
Listen up, and save yourself some frustration -
Strain the blueberries out of the dye water well.
Very well.
Anything that you don't get out of the water at this point will only cause you more work later. I was very careful to get all the gooey, dripping, chunky parts out, but I didn't account for all the tiny seeds that I couldn't even see slipping through.
Seeds that even after 4 rinses had my water looking like this

Arrrrgh
If I had planned ahead, I would have thought to run the dye water over cloth or something. Live and learn.
I didn't pour this dye over the fiber right away. I let it cool a little bit because was afraid of shocking the wool into felting. Being new, i thought it better to ere on the side of caution. By the time I poured the blueberry dye over the fiber it was only slightly warm.

I followed the same heat/rest cycles as I did for the tea, and then put it on the table to cool.
The instructions I'd read said to soak the fiber in the dye overnight (or longer) but patience is not one of my virtues. The dishes just sat there taunting me.

After just a couple hours my resolve started breaking. I pinched a little of the fiber out of each, rinsed, dried and twisted it in order to see what kind of results I was going to get.

I think the colors look soooo pretty together. I'm almost sure I will be plying them together after I get them spun.
I tried to be good after that, and just peek and poke at the fiber. I told myself that morning was that far away. Surely I could hold out until then...
Or Not.
I ended up rinsing the tea dyed fiber out after 7 hours. I just couldn't hold out any longer, and seven hours is kind of like overnight. Sort of. I reasoned that loads of people sleep less, and so that would be overnight for them...
I much better with excuses than patience, but I think I made a good decision. The resulting color is just what I had hoped for.
It took 3 rinses before the water was clear, but I did it once more to be safe. Then I soaked up as much water as I could press out of the fiber with a towel, and hung it to dry.
It was getting late, so I actually did let the blueberry dyed fiber soak overnight. Probably a good idea, because I had a lot of rinsing ahead of me. I lost count of how many water changes it took to get rid of the seeds, but it was a lot!
When I was finally satisfied, I pressed the water out and hung the fiber to dry.
--
Now the fiber is dry, and still looks beautiful. This picture shows the color most true to life

But this picture is my favorite, because it looks like the fruity sticky bun I think of when I see the colors together
I am so happy with the results, and would do this again in a heartbeat. I would dye more fiber next time though, because that's a lot of work for just an ounce each. And I would strain those blueberries better, blasted seeds!!
no subject
Date: 2012-07-26 12:45 am (UTC)From:no subject
Date: 2012-07-26 05:14 am (UTC)From:no subject
Date: 2012-07-26 01:11 pm (UTC)From:The colours are gorgeous. We've done some tea dyeing before, not for spinning, but as skin tones for Emma's needle felting. You can dye with coffee too!
no subject
Date: 2012-07-26 02:07 pm (UTC)From:Coffee for dying? But but but coffee is for drinking! Does the coffee dying come out darker, or about the same? I might be able to sacrifice a little coffee ;)
Koolaid is coming next, but not for a few weeks.
no subject
Date: 2012-07-26 05:01 pm (UTC)From:Onion skins make a great dye - brown onion skins make an orange/yellow, and red onion skins make a green!
no subject
Date: 2012-07-27 01:39 am (UTC)From:no subject
Date: 2012-08-02 01:28 pm (UTC)From:https://waysofthewhorl.wordpress.com/2011/04/06/natural-dyeing-take-2-onion-skins/ has a range of colours they got.
Pretty sure on the dye comm they talked about green from the red onion skins but a lot of my google results were reddy/brown and green when iron was added as a mordant I think. Or Alum
I don't remember.
I dyed with tea. Used it for Watson's skin tone. So british! Actually I think I used it for the porny Weasley thing I did too.
I boiled the shit out of the tea and then added the wool and let it boil in the pan. I was dyeing it for felting not spinning though. It is very slightly felted so not so great for spinning.
no subject
Date: 2012-08-02 01:56 pm (UTC)From:I know about the koolaid dying group on Rav, but I'll have to go find the others and check them out.
no subject
Date: 2012-08-03 07:14 am (UTC)From:http://www.ravelry.com/groups/spinners-marketplace is probably a bit dangerous in terms of money *g* But you can find some stuff cheap.
no subject
Date: 2012-08-03 10:42 pm (UTC)From: